On this page:
✔️ Motivation
✔️ Background Info
✔️ Your Task
✔️ Requirements
✔️ Handing in
✔️ Grade Breakdown
Motivation (Why are we doing this?)
This lab will help you solidify your understanding of pointers and memory.
Background Info
Introduction
Pointers & references can be a bit confusing at first in C++ as the language uses the same symbols for multiple operations. For example, the * symbol can be used to create a pointer, or to de-reference a pointer. Similarly, the & symbol can be used to create a reference or to obtain the memory address of an existing variable. Hopefully by the end of this lab we will de-mystify this concept and will all be comfortable with using them.
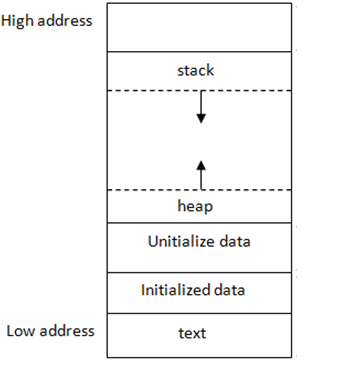
Memory (source)
Before jumping into pointers, let’s talk about memory. Generally speaking, there are two types of information being stored at any given time a program is running:
- data
- stores global variables, separated into initialized and uninitialized
- text
- stores the code being executed
Memory from a C++ program can be stored in one of two places: the stack or the heap. You can think of memory as one large array with high addresses stored at the top and low addresses stored at the bottom.
| Stack | Heap |
|---|---|
| stores local variables | dynamic memory for programmer to allocate |
| high memory addresses | low memory addresses |
| automatically deallocated after execution | needs manual allocation and deallocation |
Watch Stack Versus Heap (3 min)
The stack segment is near the top of memory with high address. Every time a function is called, the machine allocates some stack memory for it. When a new local variable is declared, more stack memory is allocated for that function to store the variable. Such allocations make the stack grow downwards. After the function returns, the stack memory of this function is deallocated, which means all local variables become invalid. The allocation and deallocation for stack memory is automatically done. The variables allocated on the stack are called stack variables, or automatic variables.
Since the stack memory of a function gets deallocated after the function returns, there is no guarantee that the value stored in those area will stay the same. A common mistake is to return a pointer to a stack variable in a helper function. After the caller gets this pointer, the invalid stack memory can be overwritten at anytime. To solve this issue, you can either return by copy, or put the value at somewhere more permanent than stack memory. Heap memory is such a place.
Unlike stack memory, heap memory is allocated explicitly by programmers and it won’t be deallocated until it is explicitly freed. To allocate heap memory in C++, use the keyword new followed by the constructor of what you want to allocate. The return value of new operator will be the address of what you just created (which points to somewhere in the heap). Even at the end of the program, the heap memory is still not freed. This is called a memory leak.
Memory leaks in small programs might not look like a big deal, but for long-running servers, memory leaks can slow down the whole machine and eventually cause the program to crash.
To free heap memory, use the key word delete followed by the pointer to the heap memory. Be careful about the memory you freed. If you try to use the pointers to those memory after you free them, it will cause undefined behavior. To avoid such issues, it is good practice to set the value of freed pointers to nullptr immediately after delete.
All of the information on memory above, is from U of I’s ‘Stack and Memory’ article, which also includes visualizations and code examples. I strongly encourage you to check it out.
Purpose of Pointers
Why bother using pointers if they seem so complicated? Two main reasons:
- It can be more efficient
- It can allow you to modify external variables from within functions
To be more efficient, it is sometimes optimal to write code that passes variables to functions by reference. This makes it so we do not need to make multiple copies of the variable, as copying a large variable (imagine a large vector) is an expensive operation. There are three ways in C++ to pass by reference. In the examples below we’re working with a pointer to the int data type:
- A pointer
int *my_ptr;- This will create a pointer (memory address) to “point” to the memory address given to it. This pointer can be re-assigned, and pointer arithmetic can be performed on it. To access the data stored in a pointer (de-reference), use the * operator again. - A constant pointer
int * const my_const_ptr;- This will create a constant pointer (memory address) to “point” to the memory address given to it. This pointer can NOT be re-assigned & pointer arithmetic can be performed on it. To access the data stored in a pointer (de-reference), use the * operator again.
- A reference
int &my_reference. This creates a “constant pointer” as above, but with automatic indirection. In other words, it automatically de-references for you when needed.
When you pass a variable by reference, you pass the memory address that this variable is located. This makes it so any change made in the function affects the data directly, instead of affecting a copy.
Take a few minutes to read the additional material beelow:
- Read Pointers and arrays
- Read Pointer arithmetic and array indexing
- Read Pointers and const
- Read Reference variables
- Read References and const
Pointers Code Examples
Below is a brief piece of code that showcases the usage of a pointer to modify a variable:
#include <iostream>

int main(){
    int my_var = 5;

    // Prints 5
    std::cout << my_var << std::endl;

    // Create a "pointer to an integer" called 'ptr'
    int * ptr;

    // Obtain the memory address of 'my_var' and store it into 'ptr'
    ptr = &my_var;

    // De-reference 'ptr' and change the value stored in that memory address (5) to 10
    *ptr = 10;

    // Prints 10
    std::cout << my_var << std::endl;
}
Do this: Copy-paste the code above into PythonTutor to view its visualization.
Taking that same concept, we can use a pointer to modify a variable even if we are out of scope:
#include <iostream>

void AddFive(int * ptr);

int main(){
    int my_var = 5;

    // Prints '5'
    std::cout << my_var << std::endl;

    AddFive(&my_var);

    // Prints '10'
    std::cout << my_var << std::endl;
}

void AddFive(int * ptr){
    *ptr += 5;
}
Do this: Copy-paste the code above into PythonTutor to view its visualization.
Below is this same code with a “constant pointer”.
#include <iostream>

void AddFive(int * const ptr);

int main(){
    int my_var = 5;

    // Prints '5'
    std::cout << my_var << std::endl;

    AddFive(&my_var);

    // Prints '10'
    std::cout << my_var << std::endl;
}

void AddFive(int * const ptr){
    *ptr += 5;
}
Do this: Copy-paste the code above into PythonTutor to view its visualization.
And once more below, with a “reference”:
#include <iostream>

void AddFive(int & ptr);

int main(){
    int my_var = 5;

    // Prints '5'
    std::cout << my_var << std::endl;

    AddFive(my_var);

    // Prints '10'
    std::cout << my_var << std::endl;
}

void AddFive(int & ptr){
    ptr += 5;
}
Do this: Copy-paste the code above into PythonTutor to view its visualization.
Read: Pointers vs References for more info on pointers and references.
Your Task
-
Download the files below (it’s easiest if you right click and then choose download or save). Do not edit any given signatures or implemented functions.
- pointers.h
- Contains the declaration of the lab you’ll be implementing. Do not alter any of the given private variables, public function signatures or implementations. Curious about the static keyword? Read about it.
- pointers.cpp
- Contains the definition of the lab you’ll be implementing.
- test.cpp
- Contains some tests that should pass as soon as you implement your functions. You should add your own test cases to this file.
- doctest.h
- The library we’ll be using for our own automated tester. There’s a ton of code in here so don’t worry too much about understanding everything it does– just know the library is extremely powerful and we’ll only be scratching the surface of everything it can do. Do not edit this file.
- Once you have downloaded all the files, inspect them. Ask questions if you have them.
- Add your own test cases to test.cpp, make sure you understand what each function is supposed to do.
- Implement the missing functions (bookends() and switcharoo()) in pointers.cpp
- Create your own makefile to compile and run your program. Refer to Lab 3 as needed.
- Run, compile, and test your program by running
makein your terminal, while in the directory all these files are located in. Debug and add additional test cases as needed.
Requirements
Your submission will be tested and graded by an autograder, for this reason it cannot be stressed enough that your program must exactly follow the assignment specifications:
- bookends() works as expected
- switcharoo() works as expected
Handing in
To submit your solution to Gradescope, select all of the following files and use the drag and drop option:
- pointers.h
- pointers.cpp
- test.cpp
Grade Breakdown
You must successfully meet requirements 1 through 2 in order to receive credit for this assignment.
To receive any credit at all, you must abide by our Collaboration and Academic Honesty Policy. Failure to do so may result in a failing grade in the class and/or further disciplinary action.