On this page:
✔️ Motivation
✔️ Background Info
✔️ Your Task
✔️ Requirements
✔️ Handing in
✔️ Grade Breakdown
Motivation (Why are we doing this?)
This lab will help you solidify your understanding of linked lists.
Background Info
Linked Lists are your first introduction to a dynamically resizing data structure that does not involve a copy operation. A Linked List is only ever as large as it needs to be. Unlike an array, data does not get stored directly into any primitive storage container. Instead, we utilize a second concept called the Node.
The Node Class
Each Node contains the data it is storing, as well as a pointer(s) to neighboring nodes, with the amount of pointers depending on the type of Linked List being implemented. This class is meant to be very simple: each Node object holds: the datum and pointer(s) to other Node objects.
Implementation notes:
- A
Nodeobject holds: the datum and pointer(s) to otherNodeobjects (for a singly linked list, only onee pointer is necessary, for thenextitem in the list.- Aside from constructors, getters, and setters are all you need to add to the
Nodeclass.

The Linked List Class
In a Linked List,Nodes are linked together to form a data structure, hence the name. The primary goals of the Linked List class are to provide an entry point into the data structure (the head pointer) and facilitate traversal, insertion, deletion, etc. The Linked List class contains a head pointer, as well as any utility functions that should operate on the structure (some are listed below.)
Implementation notes:
- The linked list class needs a pointer to the head of the list
- All linked list functions (such as traversal, insertion, deletion, etc.) should be part of the linked list class.
Linked List Traversal
For many operations, we will be required to traverse the Linked List in order to get to the location we plan to perform an operation on. A quick reminder on going about this task; you cannot move the head pointer! If you do, you will lose access to all of the data in your list. Instead, we make use of a temporary pointer.
We start by creating a temporary pointer and making the assignment temp = head, so both head and temp point to the same location in memory (the first Node.)
To advance our temporary pointer, we use temp = temp.next. temp.next obtains the memory address of the Node pointed to by temp, and the assignment operator makes temp point to it.
This process repeats until some terminating condition is met. This condition will depend on the operation you are performing.
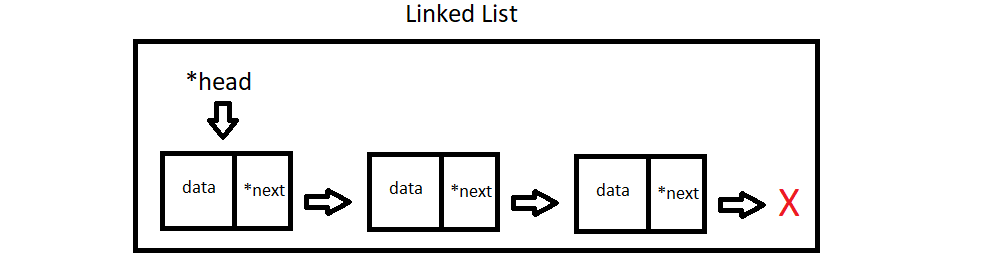
Singly Linked List

- Each node (pair of boxes) contains data (in this case integers), and a pointer to the next node.
- There is also a
headpointer, which should always point to the first node in the linked list as long as operations are not currently being performed on it (i.e, “theheadpointer points to the first node” is an invariant of a singly linked list).
Doubly Linked List

-
Each node (triad of boxes) contains data (in this case integers), a pointer to the next node, and a pointer to the previous node.
-
There is also a
headpointer, which should always point to the first node in the linked list as long as operations are not currently being performed on it (i.e, “theheadpointer points to the first node” is an invariant of a doubly linked list).
Note: The
headnode’sprevpoints tonullptr.
Circularly Singly Linked List
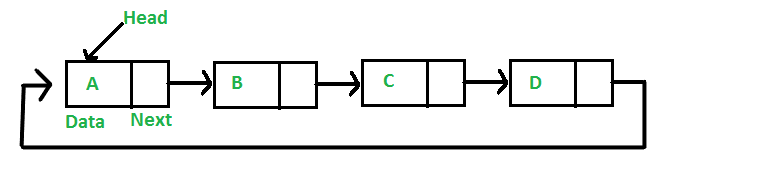
- Each node (pair of boxes) contains data (in this case integers), and a pointer to the next node. This time, the final node points back to the head node.
- There is also a
headpointer, which should always point to the first node in the linked list as long as operations are not currently being performed on it (i.e, “theheadpointer points to the first node” is an invariant of a circularly singly linked list).
Circularly Doubly Linked List

- Each node (triad of boxes) contains data (in this case integers), a pointer to the next node, and a pointer to the previous node.
- The
headnode’sprevpoints to the last element, and the last element’snextpoints tohead. - There is also a
headpointer, which should always point to the first node in the linked list as long as operations are not currently being performed on it (i.e, “theheadpointer points to the first node” is an invariant of a circularly doubly linked list).
Visualizing Singly-Linked List Operations
To begin our journey of fully understanding the inner-workings of linked lists, we will start by coding the simplest of the bunch: the singly linked list. Below are some visual representations for basic operations.
push_front
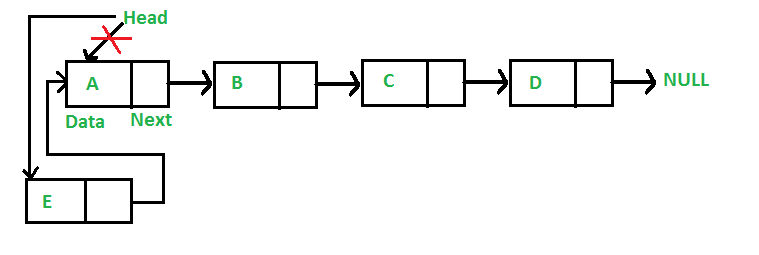
As we already have access to the head of the list, push_front is rather easy to implement. Simply create a new node, assign its ‘next’ to head, and assign head to the new node!
push_back
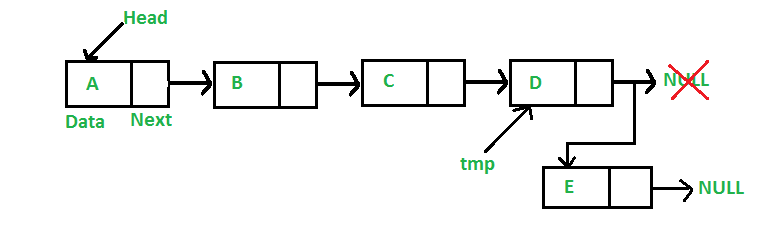
We’ll need to do a bit more work to insert at the end of the list. Seeing as we only have access to ‘head’, we’ll need to create a temp pointer that points to ‘head’, then traverse until we reach the end of the list.
insert
Similar to push_back, we need to traverse the list until we arrive at a particular location. Except this time, we don’t just traverse until the end; we need to keep count of what “index” we are at in order for the function to work as intended.
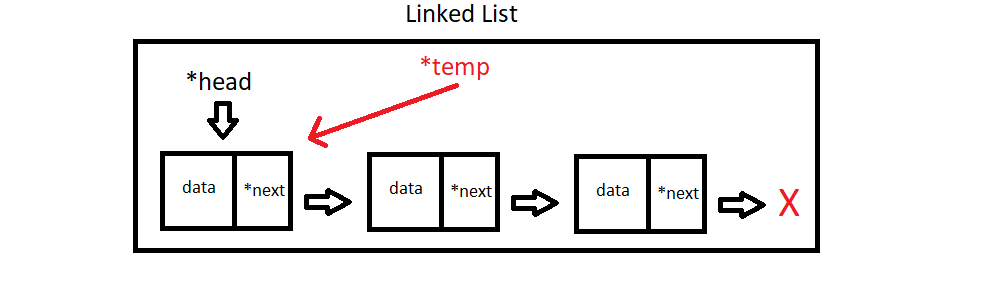
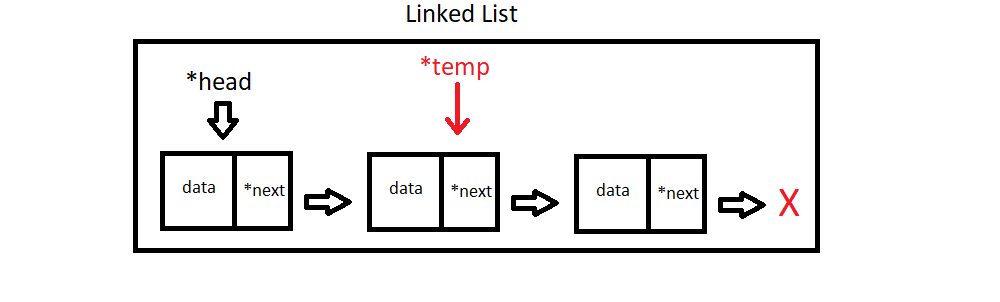
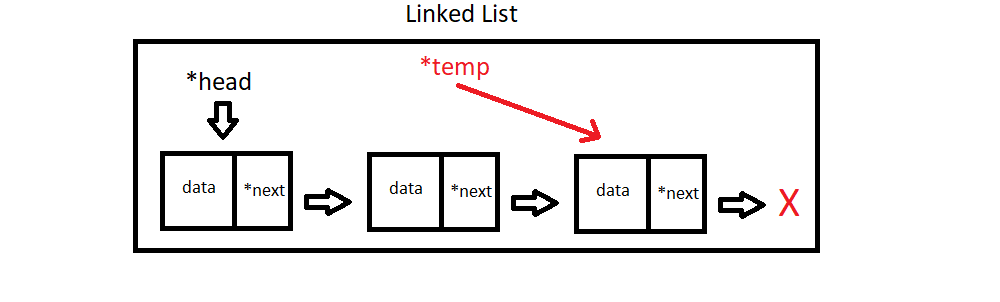
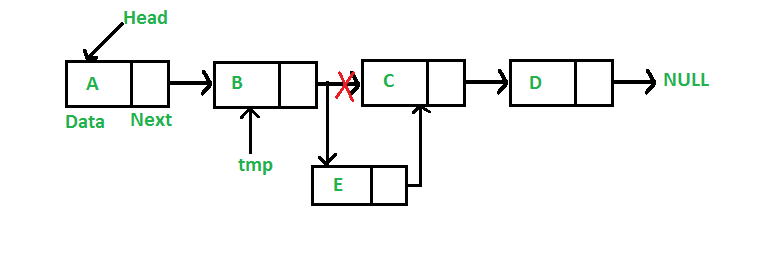
delete
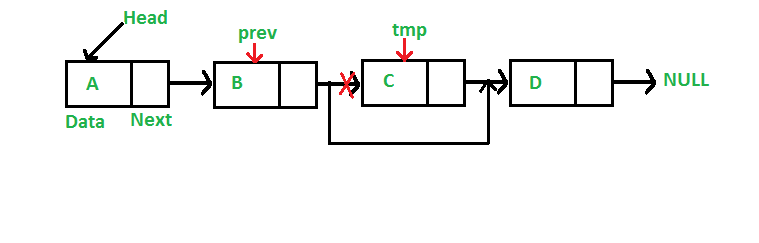
Deletion is a trickier operation than any of the inserts, as you’ll need to use two temp pointers to complete this operation. Their final state is given above if ‘C’ were being deleted. You’ll need to move the pointers together, and prev should trail tmp
Your Task
Your task is to create a linked_list class that utilizes a node class that stores integers, and performs the core tasks of a linked list.
-
Download the files below (it’s easiest if you right click and then choose download or save). Do not edit any given signatures or implemented functions.
- linked_list.h
- Contains the declaration of the lab you’ll be implementing. Do not alter any of the given private variables, public function signatures or implementations.
- linked_list.cpp
- Contains the definition of the lab you’ll be implementing.
- node.h
- Contains the declaration of the lab you’ll be implementing. Do not alter any of the given private variables, public function signatures or implementations. Curious about the
friendkeyword? Read about it. - node.cpp
- Contains the definition of the lab you’ll be implementing.
- test.cpp
- Contains some tests that should pass as soon as you implement your functions. You should add your own test cases to this file.
- doctest.h
- The library we’ll be using for our own automated tester. There’s a ton of code in here so don’t worry too much about understanding everything it does– just know the library is extremely powerful and we’ll only be scratching the surface of everything it can do. Do not edit this file.
- Once you have downloaded all the files, inspect them. Ask questions if you have them.
- Create your own makefile to compile and run your program. Refer to Lab 3 as needed.
- Complete the implementation of
node.cpp - Uncomment the appropriate tests in
test.cpp - Run, compile, and test your program by running
makein your terminal, while in the directory all these files are located in. Debug and add additional test cases as needed. - Having a tail pointer simplifies some functions at the cost of you having to keep track of it. Decide whether you want to implement your linked list with or without a tail pointer. IF WITHOUT, comment out line 9 in
linked_list.h. - Repeat steps 4-6 (implement, uncomment tests, compile and run), this time for the constructor in
linked_list.cpp - Repeat steps 4-6 (implement, uncomment tests, compile and run), this time for
push_frontinlinked_list.cpp - Repeat steps 4-6 (implement, uncomment tests, compile and run), this time for
push_backinlinked_list.cpp - Repeat steps 4-6 (implement, uncomment tests, compile and run), this time for
insertinlinked_list.cpp - Repeat steps 4-6 (implement, uncomment tests, compile and run), this time for
deleteinlinked_list.cpp - Repeat steps 4-6 (implement, uncomment tests, compile and run), this time for
containsinlinked_list.cpp - Add your own test cases to
test.cpp, make sure you understand what each function is supposed to do. Makse sure to also call several functions after each other in themixing it uptest case.
Requirements
Your submission will be tested and graded by an autograder, for this reason it cannot be stressed enough that your program must exactly follow the assignment specifications:
- Linked list functionality is as expected for all functions:
- push_front
- push_back
- insert
- delete
- contains
Handing in
To submit your solution to Gradescope, select all of the following files and use the drag and drop option:
- linked_list.h
- linked_list.cpp
- node.h
- node.cpp
- test.cpp
Grade Breakdown
You must successfully meet requirement 1 in order to receive credit for this assignment.
To receive any credit at all, you must abide by our Collaboration and Academic Honesty Policy. Failure to do so may result in a failing grade in the class and/or further disciplinary action.
Original assignment by Dr. Marco Alvarez, modified assignment version by Christian Esteves, used and modified (again) with permission.