On this page:
✔️ Motivation
✔️ Background Info
✔️ Your Task
✔️ Requirements
✔️ Handing in
✔️ Grade Breakdown
Motivation (Why are we doing this?)
The goal of this lab is to provide a review of pointers while giving you an under-the-hood introduction to the Linked List data structure.
Background Info
Pointers & References
Pointers & references can be a bit confusing at first in C++ as the language uses the same symbols for multiple operations. For example, the * symbol can be used to create a pointer, or to de-reference a pointer. Similarly, the & symbol can be used to create a reference or to obtain the memory address of an existing variable. Hopefully by the end of this lab we will de-mystify this concept and will all be comfortable with using them.
To be more efficient, the code we’ll be writing passes the vector of elements to be sorted by reference. This makes it so we do not need to make multiple copies of the vector (a mistake many of you made on Deep Dive 1!), as copying a vector is an expensive operation. There are three ways in C++ to pass by reference:
- A pointer
int *my_ptr;- This will create a pointer (memory address) to “point” to the memory address given to it. This pointer can be re-assigned, and pointer arithmetic can be performed on it. To access the data stored in a pointer (de-reference), use the * operator again.
- A constant pointer
int * const my_const_ptr; - This will create a constant pointer (memory address) to “point” to the memory address given to it. This pointer can NOT be re-assigned & pointer arithmetic can be performed on it. To access the data stored in a pointer (de-reference), use the * operator again.
- A reference
int &my_reference. This creates a “constant pointer” as above, but with automatic indirection. In other words, it automatically de-references for you when needed.
When you pass a variable by reference, you pass the memory address that this variable is located. This makes it so any change made in the function affects the data directly, instead of affecting a copy.
Below is a brief piece of code that showcases a simple usage of a pointer to modify a variable. Feel free to put this into PythonTutor to view a visualization.
#include <iostream>

int main(){
    int my_var = 5;

    // Prints 5
    std::cout << my_var << std::endl;

    // Create a "pointer to an integer" called 'ptr'
    int * ptr;

    // Obtain the memory address of 'my_var' and store it into 'ptr'
    ptr = &my_var;

    // De-reference 'ptr' and change the value stored in that memory address (5) to 10
    *ptr = 10;

    // Prints 10
    std::cout << my_var << std::endl;
}
Taking that same concept, we can use a pointer to modify a variable even if we are out of scope.
#include <iostream>

void AddFive(int * ptr);

int main(){
    int my_var = 5;

    // Prints '5'
    std::cout << my_var << std::endl;

    AddFive(&my_var);

    // Prints '10'
    std::cout << my_var << std::endl;
}

void AddFive(int * ptr){
    *ptr += 5;
}
Here is this same code with a “constant pointer”.
#include <iostream>

void AddFive(int * const ptr);

int main(){
    int my_var = 5;

    // Prints '5'
    std::cout << my_var << std::endl;

    AddFive(&my_var);

    // Prints '10'
    std::cout << my_var << std::endl;
}

void AddFive(int * const ptr){
    *ptr += 5;
}
And once more with a “reference”.
#include <iostream>

void AddFive(int & ptr);

int main(){
    int my_var = 5;

    // Prints '5'
    std::cout << my_var << std::endl;

    AddFive(my_var);

    // Prints '10'
    std::cout << my_var << std::endl;
}

void AddFive(int & ptr){
    ptr += 5;
}
Take a look at this article for a little more reading on pointers and references, then answer these questions.
Linked Lists
We’ll start with a brief introduction to Linked Lists & a brief description of the types of Linked Lists.
The Node Class
Linked Lists are your first introduction to a dynamically resizing data structure that does not involve a copy operation. A Linked List is only ever as large as it needs to be. Unlike an array, data does not get stored directly into any primitive storage container. Instead, we utilize a second concept called the Node. Each Node contains the data it is storing, as well as a pointer(s) to neighboring nodes, with the amount of pointers depending on the type of Linked List being implemented. This class is meant to be very simple: each Node object holds: the datum and pointer(s) to other Node objects. Aside from constructors, getters, and setters are all you need to add to the Node class.

The Linked List Class
In a Linked List,Nodes are linked together to form a data structure, hence the name. The primary goals of the LinkedList class are to provide an entry point into the data structure (the head pointer) and facilitate traversal, insertion, deletion, etc. The Linked List class contains a head pointer, as well as any utility functions that should operate on the structure (some are listed below.)

Linked List Traversal
For many operations, we will be required to traverse the Linked List in order to get to the location we plan to perform an operation on. A quick reminder on going about this task; you cannot move the head pointer! If you do, you will lose access to all of the data in your list. Instead, we make use of a temporary pointer.

We start by creating a temporary pointer and making the assignment temp = head, so both head and temp point to the same location in memory (the first Node.)

To advance our temporary pointer, we use temp = temp.next. temp.next obtains the memory address of the Node pointed to by temp, and the assignment operator makes temp point to it.

This process repeats until some terminating condition is met. This condition will depend on the operation you are performing.
Singly Linked List

- Each node (pair of boxes) contains data (in this case integers), and a pointer to the next node.
- There is also a
headpointer, which should always point to the first node in the linked list as long as operations are not currently being performed on it (i.e, “theheadpointer points to the first node” is an invariant of a singly linked list).
Doubly Linked List

-
Each node (triad of boxes) contains data (in this case integers), a pointer to the next node, and a pointer to the previous node.
-
There is also a
headpointer, which should always point to the first node in the linked list as long as operations are not currently being performed on it (i.e, “theheadpointer points to the first node” is an invariant of a doubly linked list).
Note: The
headnode’sprevpoints tonullptr.
Circularly Singly Linked List

- Each node (pair of boxes) contains data (in this case integers), and a pointer to the next node. This time, the final node points back to the head node.
- There is also a
headpointer, which should always point to the first node in the linked list as long as operations are not currently being performed on it (i.e, “theheadpointer points to the first node” is an invariant of a circularly singly linked list).
Circularly Doubly Linked List

- Each node (triad of boxes) contains data (in this case integers), a pointer to the next node, and a pointer to the previous node.
- The
headnode’sprevpoints to the last element, and the last element’snextpoints tohead. - There is also a
headpointer, which should always point to the first node in the linked list as long as operations are not currently being performed on it (i.e, “theheadpointer points to the first node” is an invariant of a circularly doubly linked list).
Visualizing Singly-Linked List Operations
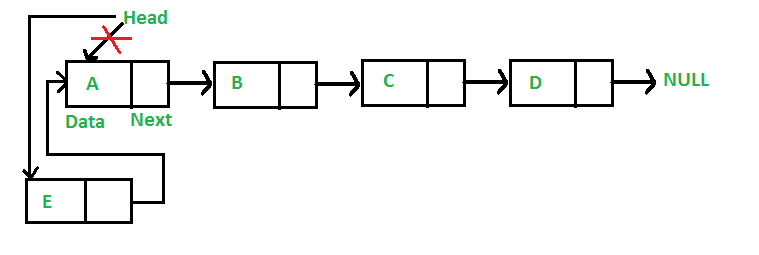
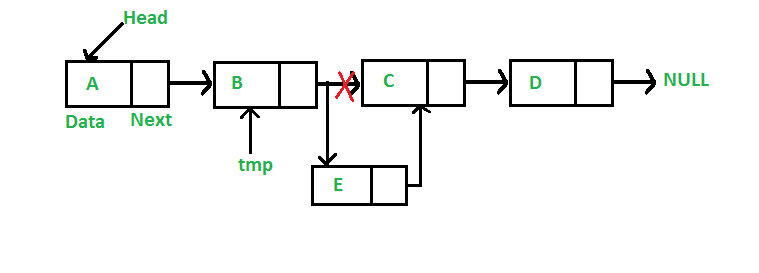
To begin our journey of fully understanding the inner-workings of linked lists, we will start by coding the simplest of the bunch: the singly linked list. Below are some visual representations for basic operations.
push_front

As we already have access to the head of the list, push_front is rather easy to implement. Simply create a new node, assign its ‘next’ to head, and assign head to the new node!
push_back

We’ll need to do a bit more work to insert at the end of the list. Seeing as we only have access to ‘head’, we’ll need to create a temp pointer that points to ‘head’, then traverse until we reach the end of the list.
insert

Similar to push_back, we need to traverse the list until we arrive at a particular location. Except this time, we don’t just traverse until the end; we need to keep count of what “index” we are at in order for the function to work as intended.
delete

Deletion is a trickier operation than any of the inserts, as you’ll need to use two temp pointers to complete this operation. Their final state is given above if ‘C’ were being deleted. You’ll need to move the pointers together, and prev should trail tmp
Your Task
Your task is to create both a LinkedList class that utilizes a Node class that stores integers, and performs the following tasks:
push_front- Adds an integer to the front of the list
push_back- Adds an integer to the end of the list
insert- Adds an integer to the list at a specific index
delete- Searches for & removes a specific element in the list
contains- Returns true if the given value exists in the list. False otherwise.
size- Returns the # of elements in the list
to_string- Returns all elements in the list concatenated into a single string. The list 5 -> 3 -> 4 -> 2 would return “5 3 4 2”
You’re welcome to either make a Node class (in which case, the friend keyword might come in handy) or make your Node a struct.
Requirements
- Implement
to_string,push_front, andpush_back - Implement
containsandsize - Implement
insertanddelete
Handing in
Please call a TA over to get checked off before leaving your lab section (regardless of how far you got). If you want to continue working on your lab after your lab section, come to hours to get checked off.
Grade Breakdown
This assignment covers pointers & Linked Lists (a non-negotiable); your level of knowledge on them will be assessed as follows:
- To demonstrate an
awarenessof these topics, you must:- Successfully meet requirements 1
- To demonstrate an
understandingof these topics, you must:- Successfully meet requirements 1 and 2
- To demonstrate
competenceof these topics, you must:- Successfully meet requirements 1 through 3
To receive any credit at all, you must abide by our Collaboration and Academic Honesty Policy. Failure to do so may result in a failing grade in the class and/or further disciplinary action.
Original assignment by Dr. Marco Alvarez, used and modified with permission.